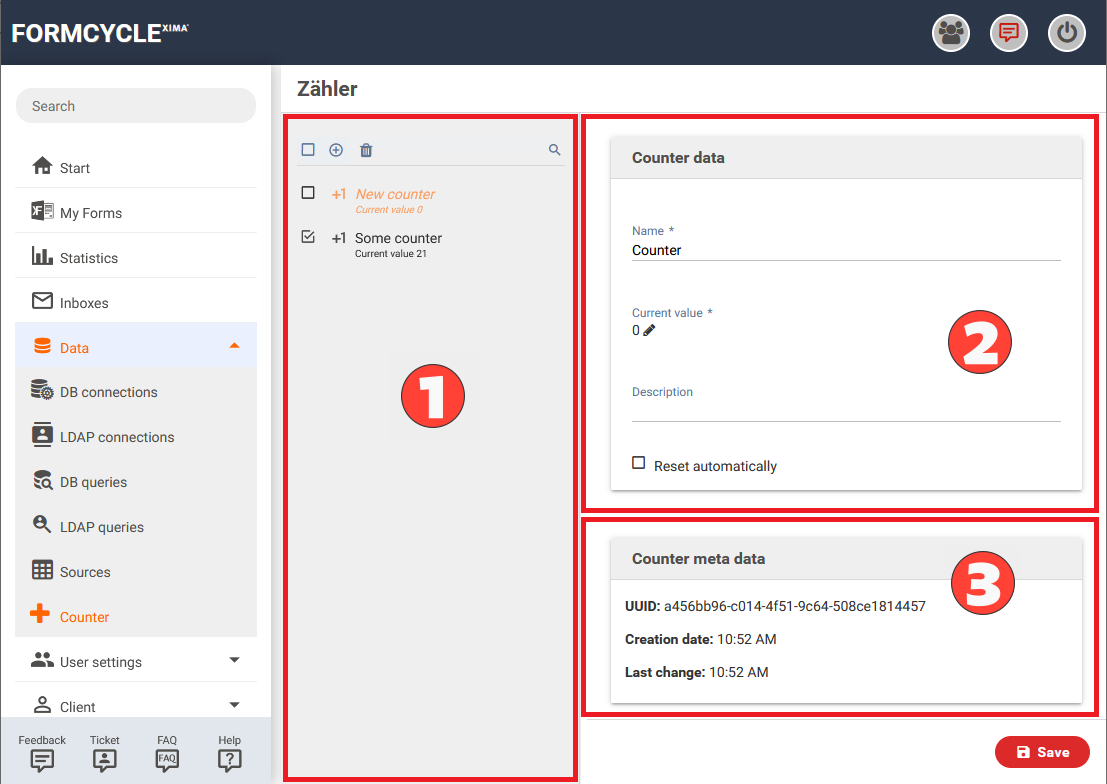
Counter
The values of the counters can be changed with the action Change counter and read out via variables and thus used in conditions, for example.
Creating a counter
Open the "Data > Counter" module and click the "New" button in the header of the list (see point 1 in figure). Then the appropriate settings for the counter can be made. With a click on the Save button the counter is created.
Configuration options
- Name
- Name of the counter
- Current value
- The current value of the counter is displayed here. After clicking on the pencil symbol, the value can be adjusted and accepted by clicking on the check mark.
- Reset automatically
- If this option has been activated, the following options can be used to specify under which conditions the counter is to be reset:
- Initial value
- Value to which the counter is to be reset
- Condition
- Condition under which the counter is to be reset. The following options are available for selection:
- - Counter greater than or equal
- - Counter less than or equal
- - daily
- - weekly
- - monthly
- - yearly
- According to the selection made here, the following fields become visible:
- Value
- Value with which the counter is to be compared. Only available if counter greater than or equal or counter less than or equal has been selected as condition.
- at
- Time at which the reset should take place. Only available if daily, weekly, monthly or annually is selected as condition.
- On days
- Day of the week on which the reset should take place. Only available if weekly is selected as condition.
- Day of the month
- Day in month on which the counter is to be reset. Only available if monthly or yearly is selected as condition.
- Month
- Month in which the counter is to be reset. Only available if annual is selected as condition.
The following information is also displayed under the settings in Counter meta data:
- UUID
- System internal UUID of the counter
- Angelegt am
- Time when the counter was created
- Geändert am
- Time when changes were last made to the meter
Variables
The values of counters can be read out via variables, for example in the workflow or as values of form elements. The syntax is as follows:
Access of counter value via servlet
Servlet URL and parameters
The value of the counters can be determined within forms via a servlet call. It is possible to select the counter by its name or UUID. The corresponding URLs for calling the values could look like the following, for example:
https://<server address>/formcycle/form/clientcounter/?frid=<Valid frid>&name=<name of the counter>
and
https://<server address>/formcycle/form/clientcounter/?frid=<Valid frid>&uuid=<UUID of the counter>
In both cases a valid form request id (frid) is required, which can be found in the form via JavaScript under XFC_METADATA.currentSessionFRID. In the same way, the URL of the servlet can be read via JavaScript under XFC_METADATA.urls.counter_client. This is important because the URL differs when called from frontend and master servers.
Return values
The result is returned as JSON. Besides the actual value, other information is also returned. The response has the following structure:
- success
- Boolean value that indicates whether the meter value could be read successfully.
- msg
- Server message related to the request, which can be used for debugging. A successful access returns e.g. Counter found.
- result
- Response to the request. If the request was not successful, only an empty JSON object literal is returned. On the other hand, if the request was successful, the following sub-items are included in the JSON object literal:
- lastChange
- Formatted output of date and time of the last change of the counter value
- lastChangeTimestamp
- Epoch of the last change of the counter value
- name
- Name of the counter
- uuid
- UUID of the counter
- value
- Current counter value
Example of an AJAX request in a form
An example AJAX request that writes the current counter value of the sample counter to the tf1 field might look like the following:
method: "GET",
url: XFC_METADATA.urls.counter_client,
data: {
name: "Examplecounter",
frid: XFC_METADATA.currentSessionFRID,
}
}).then(function(data) {
if (data.success) {
$('[data-name="tf1"]').val(data.result.value);
} else {
console.warn("Access to counter 'Examplecounter' failed:", data.msg);
}
}).catch(function(jqXHR, errorTextStatus, errorThrown) {
console.warn("Access to counter 'Examplecounter' failed:", errorThrown, "(" + errorTextStatus + ")");
});
Inserting a template for an AJAX request in the form
A template similar to the above example function can be inserted directly in the JavaScript area of the Form Designer using Autocomplete. To do this, enter Counter query (or at least Counter) one after the other in the JavaScript area and select and confirm the Counter query option suggested by Autocomplete with a click or with the Arrow keys and the Enter key.
After the template is inserted, the required functionality must be added and the name of the counter must be changed.


