Validators
Text fields may contain arbitrary text. Often you want to restrict this, such as allowing only valid email addresses or phone numbers. This aids the user when they fill out your form and informs them early about potential errors. This is done by adding a validator to a text field.
Built-in validators
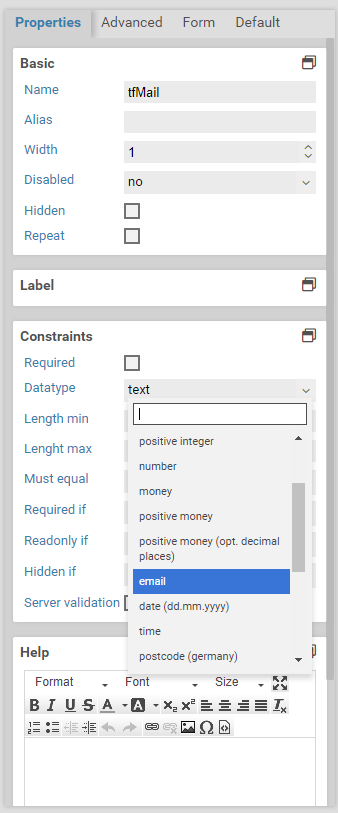
For many commonly used datatypes there are built-in validators provided by Xima® Formcycle. You can select the datatype in the constraints sections of the properties panel.
When you create a form in multiple languages, you would also want to translate the error messages. You can view and edit the error message texts in the i18n variabels tempalte.
The following built-in validators are available:
| Name | XM_FORM_VRULES | Description |
|---|---|---|
| Text | - | Default setting. The input won't be validated. All characters are allowed. |
| Letters & spaces | onlyLetterSp | Only letters (UTF-8) and spaces are allowed, including characters with diacritics (ö, ü, ä, é etc.). |
| Letters, numbers and spaces | onlyLetterNumber | Only letters (UTF-8), numbers, and spaces are allowed, including characters with diacritics (ö, ü, ä, é etc.). |
| Integer | integer | Only numbers without a decimal point are allowed, such as 100 or -100. |
| Positive integer | posinteger | Only positive numbers without a decimal, such as 100 or 200. |
| Number | number | Only numbers with a German-style decimal separator (comma) are allowed, such as /100, -4,45 or 1,9. |
| Money | money | Only numbers with exactly two decimals places are allowed. The decimal separator is a comma. Thousands separators are not allowed. For example, both 100 and 99,99 are allowed, but not 1,234 or 456.123,23. |
| Positive amount of money | posmoney | Same as money, but must not be negative. |
| Positive amount of money (opt. decimal) | posmoneyOptionalComma | Same as money, but does not require two decimal place. For example, 3, 3,4, and 3,49 are allowed, but not 3,493. |
| E-Mail Validator (International email address) | ||
| Date(DD.MM.YYYY) | datumDE | Only German-style dates are allowed, ie. DD.MM.YYYY. Example: 01.01.2015. |
| Time | time | Allows only time values of the format hh:mm, such as 01:30 or 13:30. |
| Postal code(Germany) | plzDE | Only German postal codes are allowed, ie. five digits such as 01109 or 01069. |
| Phone number | phone | Only phone number are allowed. For example, +49 351 810 500, 0049-351-810-500 and 0049/351/810/500 are allowed |
| URL | url | Only valid URLs are allowed, such as http://www.xima.de, https://www.xima.de, and ftp://ftp.xima.de. |
| IP address | ipv4 | Only IP v4 addresses are allowed, such as 127.0.0.1 and 192.168.0.255. |
| Regular expression | - | Lets you use a custom regexp for validation. When this data type is selected, you can also enter a custom error message. This message can be translated into different languages as well. The regexp is evaluated as a JavaScript regexp, described in detail at mozilla.org. |
Regexp datatype
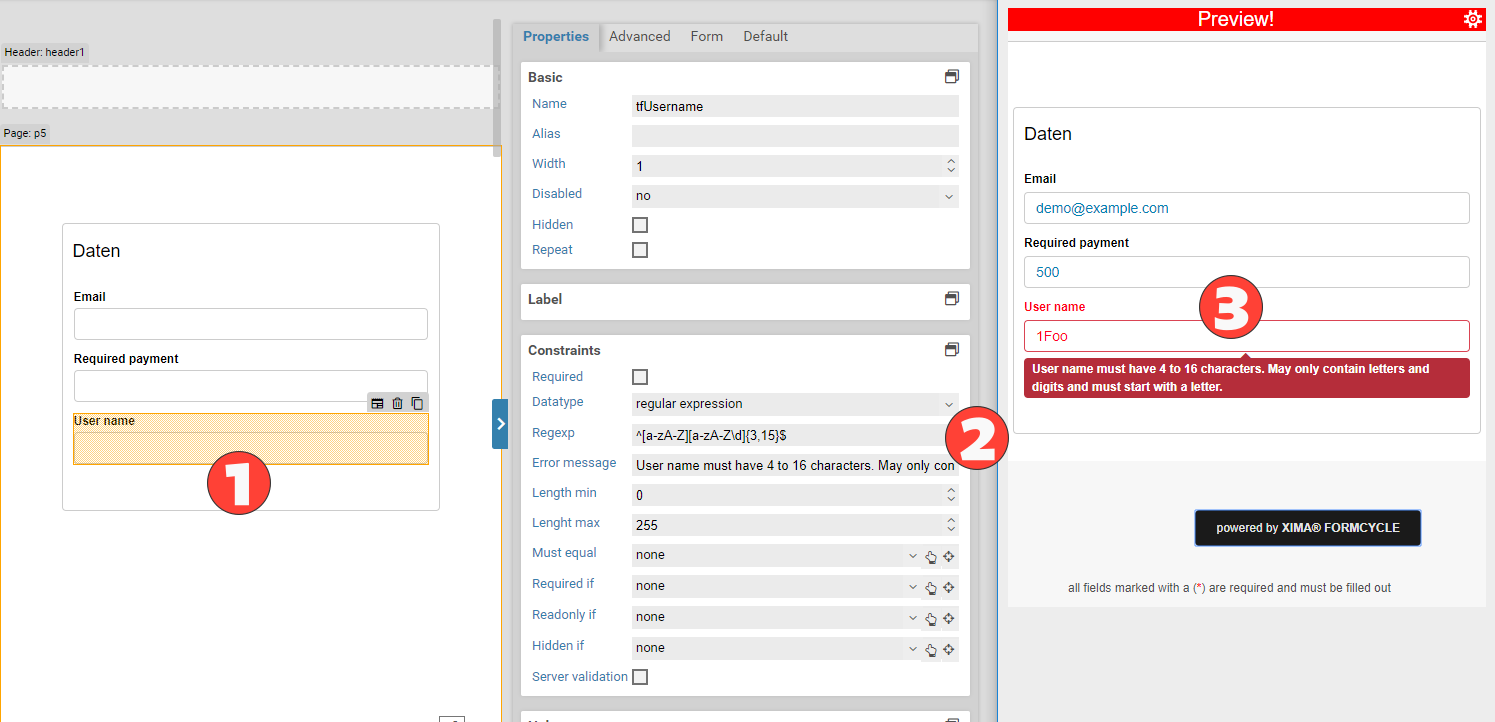
When you select the regexp datatype, you can can enter a custom regexp that is used to validate the text field. If the regexp matches the current value of the text field, it is considered valid. Otherwise, the error message you entered is displayed. The regexp is interpreted as a JavaScript regexp and must be entered without the initial and final slash (/).
As a simple example, the following regexp requires that the entered value contains at least one of the words apple or banana.
Often you want to match against the entire value of the text field. In this case, use the anchors ^ (matches the beginning) and $ (matches the end):
The above regexp checks for valid user names that must contain between 4 to 16 characters, may contain only letters and numbers, and must start with a letter.
Server-side validation
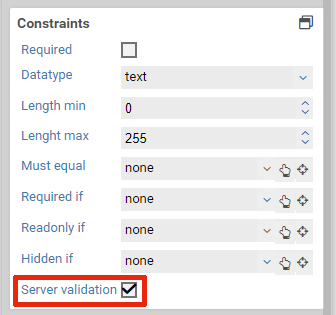
By default, the form is only validated in the browser of the user. Given enough technical knowledge, a user can manipulate the form and circumvent the validation. This would enable them to send invalid data, such as wrong email addresses. In case it becomes necessary to prevent these kind of manipulations, you can activate the server-side validation by clicking on the checkbox in the constraints section of the properties panel. When the form is submitted, the server checks the submitted data according to the rules as defined in the Xima® Formcycle Designer. When the data does not pass this server-side validation, the server rejects the submitted data and shows an appropriate error message to the user.
For each element you can choose whether or not you would like to activate the server-side validation.
Please note that the server-side validation is supported only for constraints that were set in the graphical user interface of the Xima® Formcycle Designer. If you added any custom logic or validators via JavaScript, that logic is not considered during the server-side validation process. Also, if you override built-in validators (see below), you should disable the server-side validation as the server always uses the default rules for built-in validators.
Custom validator function
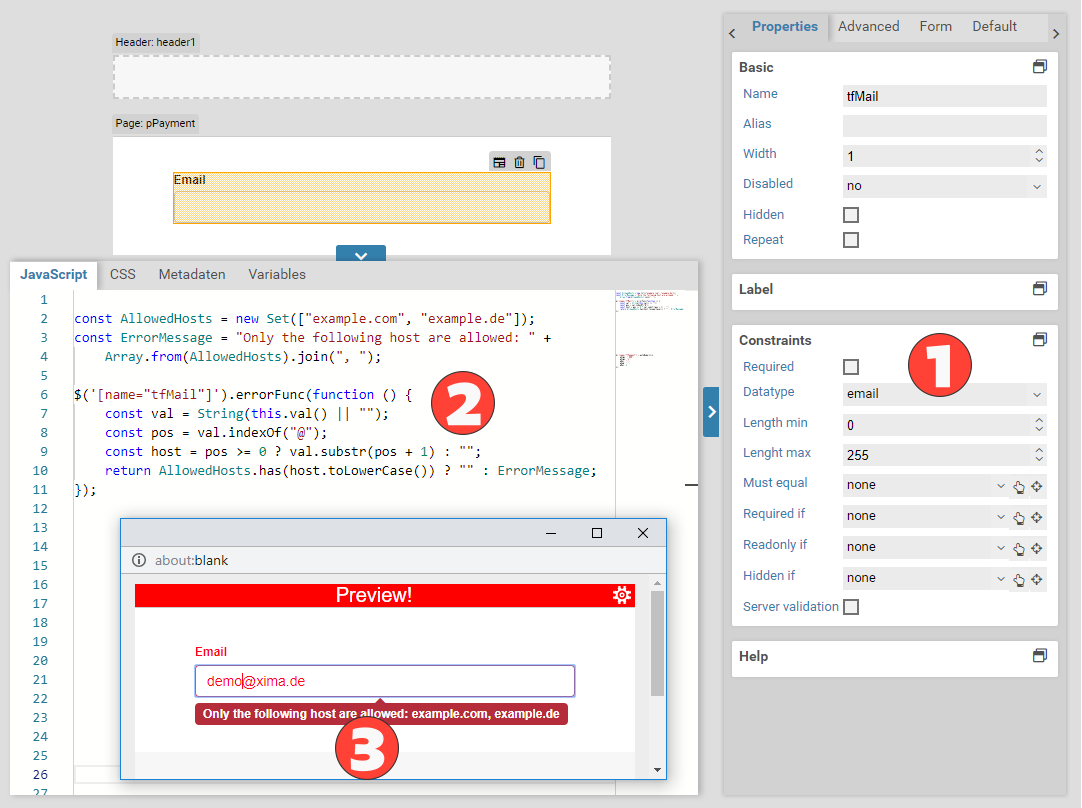
When you encounter more complex requirement, you may need to write custom business logic for validating form elements. To do so, use the JavaScript function errorFunc.
The errorFunc lets you add a custom function to a form element that checks whether it is valid or not. It returns the error message to be shown:
// The datatype of the field 'tfMail' was set to 'email'.
// We now add an additional validation rule: The host must be one of 'example.com' or 'example.de'
const value = String(this.val() || "");
const hostIndex = value.indexOf("@");
const host = hostIndex >= 0 ? value.substr(hostIndex + 1) : "";
if (host === "example.com" || host === "example.de") return "";
return "The host must be either example.de or example.com!";
});
// The datatype of the field 'tfMail' was set to 'email'.
// We now add an additional validation rule: The host must be one of 'example.com' or 'example.de'
var value = String(this.val() || "");
var hostIndex = value.indexOf("@");
var host = hostIndex >= 0 ? value.substr(hostIndex + 1) : "";
if (host === "example.com" || host === "example.de") return "";
return "The host must be either example.de or example.com!";
});
Plugins
Another way of adding custom validators is by uploading a Java-Plugin to Xima® Formcycle. Once you have uploaded and installed the plugin, you can select the new validator as a datatype in the constraints section of the properties panel. Developers may view the documentation for this plugin type.
Overriding validators
It is possible to override the built-in validators. The validators are regexps that are stored in the global JavaScript object window.XM_FORM_VRULES. The corresponding error messages can be found in window.XM_FORM_I18N. You can use JavaScript to override some entries of these objects:
For example, you can modify the validator for the money datatype; so that it now accepts a period instead of a comma as the decimal separator:
XM_FORM_I18N.money = "Please use a period before the cents (ex: 100.00)";
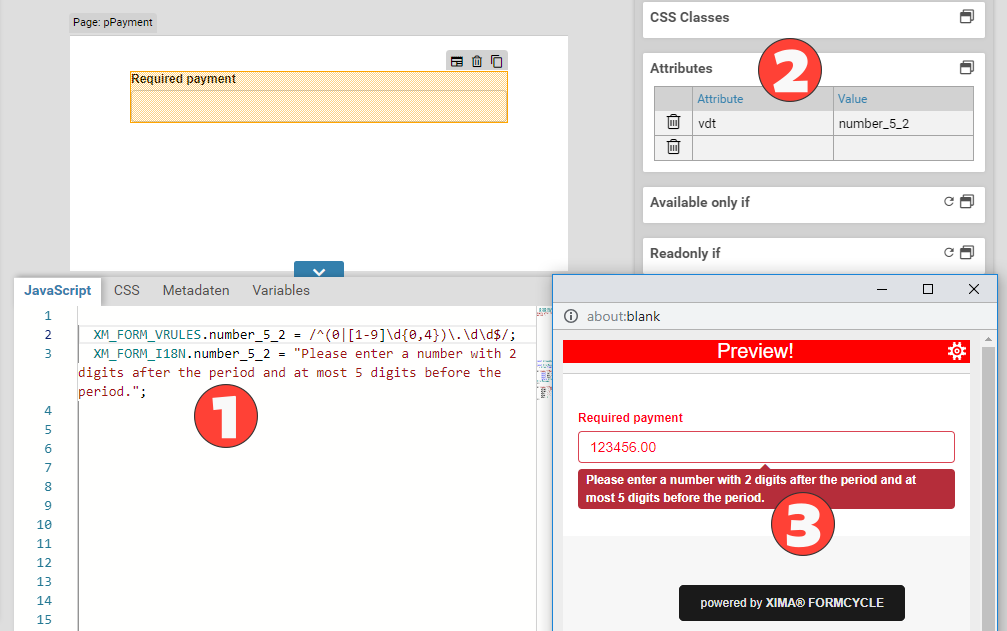
Furthermore, you could also add new entries to the JavaScript objects XM_FORM_VRULES and XM_FORM_I18N. To use the newly created validator with a text field, set the HTML attribute to the name of the validator. You can set HTML attributes in the attributes section of the properties panel.
For example, to create a new validator for numbers with exactly 2 decimal digits and at most 5 digits before the period:
XM_FORM_I18N.number_5_2 = "Please enter a number with 2 digits after the period and at most 5 digits before the period.";
The new validator has not got the name number_5_2. This is the name you need to set as the value of the HTML attribute vdt.

